Today is Little Miss J's birthday! And for her birthday I made her these bird/butterfly wings!
She has asked me to make her some in the past, so finally I thought I'd get to it for her birthday!
*I also make these bird glasses and butterfly antennae to help Little Miss J really get into character. Hehehe!
{Sorry, no tutorial for them.}
Materials:
-fabric in desired colors for the "feathers", the amount will depend on what size the wings are {I went for a "rainbow" pattern, with pink in place of red}
-"scrap" fabric large enough to cut two wings from {I used a piece about 18" x 35"}
-coordinating fabric {this piece will be the under part of the wings/facing the front with being worn} large enough to cut two wings from {for me about 18" x 35"}
-sewing machine
-thread
-sewing pins
-iron & ironing board
-elastic, about 1/4 inch wide {about 25-30 inches long}
-4 inch piece of 2 inch wide elastic {or you could use 2 or 3 pieces of the 1/4 inch wide}
-pinking sheers
-rotary cutter and mat, optional but very handy!
-sewing tape measure or ruler
-sewing pen or marker
Process:
1. If possible, measure the little one you are making the wings for; from the middle of back to wrist {for me 17"}, also measure around the wrists {for me 5"} and upper arms {for me 7"}.
* It will also be helpful to get the measurement from the middle of the back to about the upper part of the arm, about 3 inches past the arm pit {for me about 9"}.
2. Use the back to wrist measurement to make a 1/4 circle on a "scrap piece" of fabric; this fabric won't be seen, but will be the piece that you will sew all of the "feathers" to.
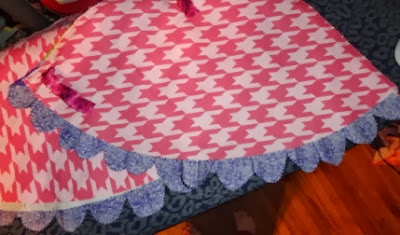
 |
This is from my Ruffled Tree Skirt tutorial :
I know this is hard to see, but you hold the pen at the measured mark,
hold the other end of the string taut on the point of the triangle
{so you create a sort of compass};
move the pen, keeping the other end on the corner. |
I found it easiest to create the 1/4 circle on the corner of the fabric.
3. Cut 4 inch strips of each color of fabric you will be using.
4. Then, I just free-hand cut the scalloped edges on one side of each 4 inch wide strip. {They don't need to be perfect, when you get them all together it'll look great.}
5. Next, starting at the bottom of the wing, the curved edge begin pinning a scalloped strip to the edge {I pinned mine so that the edge of the 1/4 circle was just within the valley of each scallop}.
Note: You will have to fold/pleat the fabric to help it to follow the curved edge.
On the top edge {where the hand will be} I folded and pinned the strip over to the other side to create a more finished look.
This is what both wings look like ready to sew on the first layer of "feathers".
6. Sew using a straight stitch to attach the "feathers" to the wing; following the curve of the top/straight edge of the scalloped strip. Repeat with the next color/layer of "feathers".
I sewed one direction all the way across, then turned around and sewed back the other direction to ensure that each strip of "feathers" was securely attached by two continuous stitches.
Note: I also didn't bother back-stitching, because I planned on "sealing" my edges another way.
7. Continue this process until you fill up the wing...
8. For the last and final "feathers" at the top corners {which will be at the top of the back/shoulders} I just cut two 1/4 circles with my pinking shears.
This is what the wings look like at this point...
So, what you get is the top edge of each wing looking like this with the "feather" strips folded over.
This is what the back of the "scrap" wing piece will look like; this is why I used a piece that wouldn't be seen; so the stitching will be hidden...
9. Line up the edge of the ruler with the edge of the wing {the line that will run parallel to the spine} and trim off the excess of each of the "feather" strips, so that you have a nice straight edge. Repeat for other wing.
10. Use the coordinating fabric, cut two wings in the same way that you cut the "scrap" pieces, in step #2. These will be the "under-wing" pieces.
11. Next, I cut a long strip of fabric 3 inches wide for the elastics that will go around the wrists and upper arms.
12. Fold and iron the strip in half.
This gives you a center line; now open and fold the edges in just shy of the center ironed line and iron.
13. Measure out and cut your elastic {you won't need the full measurement from around each wrist and upper arm; although I would rather have too much and cut it off than not enough and have to start over}.
14. Set your machine to a stretch stitch or a zig-zag stitch.
Place the elastic on top of the folded and ironed piece and back-stitch the elastic into place.
Now pull the elastic while sewing the rest of the length.
If you are doing this correctly the sewn elastic band will curl up behind your sewing foot...
This is what it looked like...
And this is what it looked like when held straight/flat...
Repeat for all pieces of elastic; you should end up with 4 pieces {two for the wrists and two for the upper arms}.
Note: I suppose you could just do one long piece and cut it to the length you need too; but I did them separate.
15. Now, cut the prepared elastic band to about 2-3 inches shorter than the measurement of the wrists and upper arms.
Pin the wrist pieces to the upper corner of the "under-wing" piece, where the top edge and curved edges meet; about 1 inch in from each edge. Fold the ends under for a more finished look.
Then, pin the upper arm elastic bands at about the distance from the spine to about 3 inches past the armpit.
16. Sew wrist and upper arm bands into place, I used a zig-zag stitch and went back and forth about 4 times.
17. Now place and pin the "under-wing" piece on the "scrap" piece with wrong sides together.
18. Zig-zag stitch across the top edge, attaching the "feathered" wing to the "under-wing".
Repeat for other wing.
This is what the "under-wing" will look like...
19. Now you can see that even though I started out with the "scrap" and "under-wing" pieces being the same shape and size the "scrap" piece is showing past the "under-wing" piece...
20. Fold up the "under-wing" piece.
And trim the "scrap" fabric...
 |
| You can see the piece I trimmed off here. |
Now fold the "under-wing" piece back into place, repeat with other wing...
 |
| See, you can't see the "scrap" piece anymore! |
21. Next, flip the wing over and pin up the second from the bottom layer of "feathers".
And pin the bottom row of "feathers" to the "under-wing" piece behind it. Repeat with other wing.
22. Now, zig-zag stitch along the curved edge of each wing.
23. Next using the same method as in step #11-12, create a piece that will become the "seal" for the inside straight edge {which will run parallel to the spine; I also folded the upper and lower corners in to create a 45 degree angle finished edge}...
24. Pin in place, sandwiching the straight edge of the wing inside the "seal"...
25. Now sew, using a straight stitch along the folded edge of the "seal".
Repeat for other wing. This is what they should look like.
26. Now for the last part, place the 2 inch wide elastic at the top of the wings, about 1/2 inch down from the top edges.
Fold the ends under to make it look more finished and stronger. Pin in place...
27. Zig-zag stitch the elastic in place; I went back and forth several times to make sure the stitch would hold well through all of the flying! ...
Repeat for other wing...
This is what the attached elastic looked like on the other side...
The elastic allows for some stretch in the back so that the wings are more comfortable and more durable for flying.
You're DONE!!!
The underside of the wings...
The outside of the wings...
Enjoy and please let me know if you have any questions!
Or if you would like some wings, but don't want to make them yourself, message me or contact me on My Etsy Shop and I can customize some wings for you or the little one(s) in your life!


No comments:
Post a Comment
I love hearing what you have to say; let me know what you think. I look forward to comments and will reply to your comments or questions! Thanks for checking out my blog; come back to visit soon!